Showing posts with label PirateShip. Show all posts

Saturday, 19 October 2019

Pirate Ship Project - Week 3


Week 3

This is the final production week on this project. Although I may work on polishing it soon after. The reason as to why I'm not immediately working to fix the issues, is because I need to move on to a new 3 Week project and start thinking about my Final Major Project. 

Before I get into the production of creating the environment I want to put down a bunch of critique that I have for myself, and what I was graciously given at EGX when getting feedback from some lovely people from Creative Assembly. 


Straight off the bat, the Narrative I'm trying to portray is not obvious. The hints that I have given (the Bag and the Map) are too obscure to understand the story, I need stronger evidence of the story. This could be due to the fact that the narrative is a bit too complex to convey with just objects, and that I need to simmer it down to a core essential idea. Maybe a mutiny would be better, it can be conveyed by blood and weapons on the ground as if there was a battle recently, there could be bullet holes or large slashes in the walls and pillar. This would be much more obvious. This is also something that I need to remember, I need to keep it simple and easy to understand.

Second, I haven't created a strong composition, I have multiple distractions and dead ends in the scene. I wanted to lead the eye to the window, and although having the window being the brightest area of the scene making the eye naturally go there, there isn't much after. I have two ropes that are somewhat close to each other. One which is tied to the cannon to make an escape route, that seems more normal because its a common element in the scene. And the other which leads you to the narrative props. 


A problem with the lanterns is that the light naturally guides your eye, but it doesn't lead to anywhere. And leaves the viewer/player confused. I think something that could help this is by moving the rope which is tied to the cannon barrel should be moved over to the pillar next to the barrel. Then the rope which anchors the cannon to the ship should be untied and loose, so that the person would be able to push the cannon out of the way of the window. 


The map looks too clean and should be way more dirty if its on the floor, also these narrative props could be moved to the on top of the barrel (next to the pillar) instead. This means that the rope from the window (the brightest source) would then lead you to the narrative items. Also there could be much more story added to this map. Maybe the person who stole it has to hide it, so its slightly tucked away, or maybe they had to fight for it and there's some bloody hand marks. Looking to the future, the problem with this narrative is as I mentioned above, and I should either change it or make it more obvious.


Although these shots look nice cinematic, there is a disconnection between these area's and the focus area. They are a nice plus, but it would be better if I could get similar shots from the focus area, and that makes sure that there is a clear. 

There are also lots of bugs within the UE4 level, there's lighting bugs, there's really strange black area's on the ladders where there shouldn't be, and you can see seams on the ropes. 

But the lessons I can take away from this are: 
- Focus on a small area and have high detail.
-Start with a strong composition from the beginning.
-Spend more time lighting and set dressing. 
-Have an easy to read narrative.
-Create the Master Material immediately.

There are positives from this project as well, this was a great learning experience as I had to use Materials and Textures efficiently to get the most use out of so little. The Lighting and Materials turned out nicely, there's quite a warm atmosphere given by the lanterns and cold from the white skylight. Also I had a fear of metal materials being too dark to see, and this was fixed by referencing PBR materials and keeping the values of the albedo above a certain threshold. This was also the first time of utilizing Parallax Occlusion Mapping properly for edge damage decals, which I learned a few things from trial and error. 

Now onto what I was doing for the week.

As I mentioned before I learned about Parallax Occlusion Mapping or POM's for short, this can be utilized for various situations. Such as placing sticks or leaves above the ground to give a sense of depth, or using a height map for some bath tiles so each one seems slightly offset. 

The reason as to why I wanted to use this in my scene is because I have a lot of tiling textures everywhere. And when everything shares a similar texture, things can look to be samey. Also, since I can't give all of my objects unique UV's, it becomes difficult to add character and age to the environment. Things such as scratches, dents, or scuffed edges have to be added in by using deferred decals.

When researching the workflow for deferred decals, I came across this video. Even though the tutorial starts in Blender, the same principles apply in 3dsMax. That video also helped me in setting up my decal in UE4.


This is the edge damage trim sheet I created, I wanted quite a varied array of edge damage, cracked edges, erosion, scratches etc. It was difficult trying to find any reference of edge damage online so parts of it was just experimenting with what looked interesting.


As an example of the Deferred Decal's affect here is my ladder before adding the Decal, which is above. 

Below is what it looks like within Unreal Engine with the Decal applied, as you can see it adds an extra layer of depth to the model, also my reasoning behind the ladder being damaged is because it would be constantly used. Although looking back its probably more likely to be warped and sanded down by the friction of the feet. 


A little tip for making assets with deferred decals that I found from trial and error. When making the planes that float on top of the model, make sure that it hugs the mesh tightly and has no gap. When you set up the Material you can adjust the offset of the POM, if your planes aren't hugging the mesh then there can be some lighting bugs such as being lit from behind which makes the Decal black. The offset can also be changed by a scalar parameter, so you can change the offset in an instance material.

Another example is this lamp. 


Although a small critique I would give for this would to make the Decal planes larger, at this moment the edge damage is pretty much a micro-detail which can't be seen from afar. Making it larger should make it more obvious.

Something that I left to the last minute was collisions and light maps. The reason as to why I left this so long, is because a model can go through multiple iterations. If I want to change the model partway through production it would mean that I would have to make the light maps again and adjust the collision. Although its probably better to create light maps sooner so that I can start building static lighting sooner. There is a large difference between dynamic and static lights.

I know that a game ready environment and asset should have proper and well thought collision, as it is what the player interacts with. I know from playing so many games that sloppy collision can ruin the player's experience. However I did not have the time to create the best collision boxes. This is something that I can rectify later in the polishing. 


I have learned a lot from this project, and I hope to learn more in the next.


Tuesday, 15 October 2019

Pirate Ship Project - Week 2


Week 2


This week was a focus on creating the Narrative Assets and creating Tiling Textures.Since I was able to finish all of my mid-poly modular assets last week, I thought it would be a good time to focus on creating the HighPoly's of two objects. These are the Hammock, Ditty Bag and Treasure Map.

I started with the Hammock as I thought it would be fairly simple. I tried using Marvelous Designer to simulate cloth, the set up was fairly simple, I made some hoops in 3dsMax that would interlock with the holes in the fabric. However I found that every time I simulated the fabric, it would just tear through the hoops and fall flat on the floor. At one point I was able to succeed in getting the fabric to hang from the hoops, but when I put another object (a pillow) ontop, the hammock would fall out of the hoops. I understand that I don't know Marvelous Designer that well, and that if I spent more time or asked for help I could fix the problem. But I couldn't spend more time, since I could spend that time elsewhere. 


Instead I created the Hammock in ZBrush. The setup that you see above, with the rings is the same as how it looked in Marvelous. Within ZBrush there is this tool called ZModeler, it allows you to manipulate an object similar to how you do in Max. You can extrude, inset, add loops etc. I use this tool on a very simple and low poly model, as it allows me to vastly change the silhouette and control how the model Subdivides. I can add more loops (swift loops) to an edge to get a crisp look. 


I got a plane into the rough shape of what I wanted the silhouette to look like, and then duplicated it and Dynameshed the model. This is so I can push and pull the forms to get the folds that is similar to the reference I was using.


After some feedback I got from tutors I refined the sculpt more, and smoothed out some of the folds. Since this object will be repeated within the scene, I don't want to add any marks that obviously tell that its the same object everywhere. 


I created the holes whilst the model was Dynameshed, masking a circle shape on the two sides of the cloth and used CurveBridge. I'm not happy with the result of these holes as the shapes can largely change depending on how you mask it. Its difficult to mask a perfect circle on both sides, 18 times. In my opinion it looks shoddy.

I created the rest of the items within the Hammock in the same method. My goal with the Hammock is to look as if there is someone sleeping inside, but on closer inspected there's no one. This is to be evidence of the narrative within the scene. 

I repeated the same process with the Ditty Bag (a sailors bag to hold small tools and provisions) however I created the holds by creating cylinders that would then Boolean the holes in the bag. This was a better method as it allowed me to accurately create the same hole multiple times. And it has a cleaner result.


A part of me wants to only just make bags. 

The references that I mainly used are below. They were sourced from Google Images.


After creating the highpoly sculpts I retopped the lowpoly within 3dsMax and have yet to texture in Substance Painter. 

Something that desperately needed my attention was unwrapping all of the objects within the scene. I wasn't sure what exactly Texel Density meant, but after watching some videos and attempting somethings my self, I think I understand. Create a plane whatever the size is stated, so if its 1024 per Meter². Create a 1 Meter plane apply a 1024 UV Checker texture to the plane. When Unwrapping objects the UV size should match with the plane, having the checkers the same size.


I also worked on the materials within the scene. I started with the Wood Floor as it takes up the most amount of space in the scene. From that I just worked on the rest one after another. 

There are two versions of the same Material, which is the 2nd and 3rd Material. The reason as to why is because I wanted to have a noisy texture and not so noisy, so that I can have a variation. The set up is the exact same and so are the normals. Just that the base colour has less tiger stripes and branch spots.  


For the wood boards I used a Pixel Processor to make sure the pattern doesn't spill over to the next plank, and offsets the x and y of the pattern to give the illusion that its a unique plank. 


The rope is a very simple Linear Gradient that is rotated with a safe transform grayscale node. The Linear Gradient is tiled within its own node to make more strands of the rope. I plan to make the rope in the scene with BluePrint Splines within UE4. This would be applied as a tessellating texture to give a rope look.


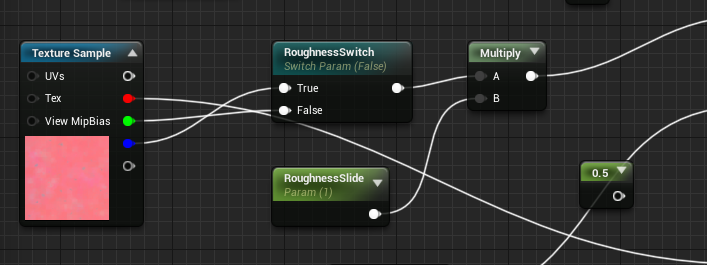
 One thing that I do to be more resourceful is use the RGBA packed texture as much as I can. If I know that a material doesn't have any metal parts or is all metal, then there is no need to export a simple white/black texture. All I need to do is plug in a Material Expression Constant within the Material in UE4, and set it to 0 if its not metal, and 1 if it is. This allows me to have a second roughness map in the blue channel. I can then use a Switch Parameter, plug in the two different roughness maps and have a tickbox in the instanced material to switch between roughness maps. This will be something I will use in future projects as well.


I am aiming to finish the project next week, so that I can bring pictures to EGX and get some feedback. 

On a side note I was able to finish Last Of Us this week, and its a masterpiece. 


Sunday, 6 October 2019

Pirate Ship Project- Week 1

Week 1


After the first day I started to model modular pieces that would make up the majority of the scene.
My focus was creating assets that can be re-used and fill up the space to make it seem crowded,
I'm also limiting the playable area with boxes and netting, so although the player can see the
environment, they can't explore every nook and cranny. 


There are a few things that I did to hide some blemishes, I created pillars that hide where the walls
meet. The reason for this is because the shape of the ship's walls bulges in and out, which makes
it difficult to create modular pieces to fit perfectly together, and I didn't want to make the walls
of the ship one large model. The solution was to hide where the walls meet with pillars, to keep
the immersion of the scene.


I also started to think about the small section of this environment that would be my narrative scene,
and set up a camera to get a feel for what I could do. As I only want to showcase a small slice of everything I think having the camera's facing towards a window allows me to focus on a small point.


After modelling the walls, floor and ceiling. I thought the first thing I would make props wise would be a cannon. This model would take up a large area of the scene and would also be repeated, it also got me into the pirate mood.

For this environment I have a 50k tri-budget and 2x2048 texture maps (includes diffuse, normals, and packed maps). I can see from this that I have a lot more freedom with modeling than I do textures, which is why I decided to make a lot of my assets mid-poly. This process needs chamfered edges and weighted vertex normals. With this I can apply tiling textures to the models and still have nice crisp edges. Additionally I'm going to try something I haven't done before, having edge damage as a trim sheet. This will need planes floating above the chamfered edges and unwrapped to the trim sheet. 
You can find more information about it from here
I have never attempted this before, so I'm unsure of whether this trim can be a normal material or has to be a decal. If its the latter then it would most likely slow down the FPS however it would depend on numerous factors.

There is another method that I'm aware of, Sunset Overdrive's Ultimate Trim. This method requires the trim/ tiling texture to have beveled edges in the normals. The model is then unwrapped to these beveled edges in the texture sheet. The positives is that the models can be low poly and have fake normals on edges, no need to add extra any extra geometry. There are some drawbacks to this method such as making cuts or seams in the UV's to make sure it lines up to the texture. The reason for why I'm not doing this approach is because I want my edge damage and my normal material to be separate, and allowing for much more freedom and re-usability of the textures. However I may try this method in a future project. 

As I have 2x2048 textures, I must break it up into smaller texture sheets so that I have a variety of materials in my environment. My thought process for this is that anything that needs to be large or takes up a lot of space would be a 1024 texture, such as the walls and floor of the ship. Assets that need to be baked such as the Hammock and Bag will have their own texture sheet. Textures such as metal and rope can be small 512 textures as they would tile much more. And the Treasure Map will have a unique 512 because it would be a small asset. 

There is one last 1024 texture that I may use for a generic wood material or broken down into four 512 textures for metal variations or more decals.


At the end of the first week I was able to get a lot of my props to mid-poly and placed within UE4, and after looking at my scene I was able to get a better idea of what the narrative could be. 
As I'm doing the gun deck of a ship I thought it would be interesting to focus on one of the crewmen, who he would be or his goals. I thought that this gunman wanted to desert the group to make his riches and leave his pirating behind. Then I figured out why, he stole some of the loot that was recently acquired by the pirates. And lastly was when would he make his escape? When could he leave without alerting anyone? That would be either night or early morning when everyone is still asleep. 

After figuring out the broad strokes of the story I could focus on the small parts that would be evidence or clues to this. Whatever he stole must be worth a lot to betray the crew, so it had to be either an expensive item or something that led to more expensive items. This can easily be a Treasure Map. If he was going to flee he would need food and tools for the journey, that can be a Bag holding the provisions. And finally how can he escape without alerting everyone? Through one of the cannon windows, a rope would lead out of the window to the sea where a row boat would be. 

From that I can make a narrative with three items, a Treasure Map, a Bag and some Rope.


From these screenshots you may notice that there is a clear lack of ropes, the reason is because I am going to make the ropes using procedural splines within UE4. I'm creating ropes this way because it would put a large dent in my tri-budget if I were to model them, and secondly I would have to guess where the place these splines blindly. Doing it in UE4 allows me to accurately place the splines within the scene. 

Also the ocean and sky you see outside the window is a HDRI image that is free and sourced from here.


Tuesday, 1 October 2019

Pirate Ship Project-Third Year Starts


Pirate Ship Environment


Day 1


At the very start of my final year we have three short projects to choose from, that all has a project length of three weeks each. For my first project I chose the Pirate Ship Brief. I'm tasked to create a game environment within a small section of a Pirate Ship. There are lots of spaces to choose from large ships, however I chose to create the Lower Gun Deck from a Sloop-of-War. 

The reason behind my decision is that I wanted to get a stronger grasp on building modular kits and re-using textures in a smart way. I also feel like this is a good way to gauge my time management skills, as this is a fairly straightforward environment. Time Management skills will prove to be useful for my FMP later down the line. 

As it was the first day of the project I collected reference material, and then dissect all the elements that made the scene. 

I also collected imaged of people within the environment to get a sense of scale that I can replicate using a dummy in the scene.


Once I had some reference images I immediately started to block out the scene and bring it into unreal, I feel like the sooner I get within the engine the quicker my progression will be.


The floor and ceiling are going to be removed later down the line, as they are just a plane shaped into the silhouette of a sloop. This is just used to position the walls along the edge of the plane. 
After The walls are in place, I will replace the floor with a 1m² or 5m² square plane that will snap together. This is so I can have holes in the floor and ceiling for ladders and stairs.


I feel like I have a good amount of ref to help during this project, I've been able to find videos as well. The images have been sourced from Pinterest, Google Image, and Youtube.