Samovar
Coming into the 17th week, I wanted to focus on some assets that I've been putting off for a while, since I was focusing on the larger assets for a longer time. All these assets are narrative items, and also might be inspected by the player, which means the level of quality should be much higher than a random prop.
I was looking online for references as to how dense a mesh can be for the same exact purposes. And after reading through a few Polycount forums I found this spreadsheet of poly budgets: Click Here. Again this isn't an exact reference as each game or studio will have different requirements, but its a good starting point. If you look at the table and the budgets for props, they range from 10k to 40k. Objects that can be inspected in a similar way to Skyrim or Resident Evil, are on the higher end of budgets, whilst small filler objects in the background would be less than 10k.
Since this Samovar will be an object that can be inspected, it will have a budget of around 10-20k tris.
Ever since my Ubisoft Art Test I've been wanting to do some hard surface high poly modeling, and I wanted to use some of the techniques I learned from that test.


Going into production, I started with creating the high poly. I based the model off of multiple samovar's with different designs. I picked and chose which parts of the designs I wanted to integrate into my model. The main factor for my decisions was time consumption, how long would it take to do a detail and does it add value to the look?

One such decision was having a smooth body instead of an engraved looking one. Firstly there is a lot of difficult as its an angled surface that's also circular. And secondly I want to have some rest space for they eye, as all the other high frequency details will pull the focus.
Since this model is going to be inspected, I have to consider that it will be rotated in different ways. Making it so that I have to have a complete model. Not allowing me to polys that wouldn't necessarily be seen if it was just a static object in the scene.


Something that really helps modeling objects that have a use, is to see how the object is used. It sounds simple, but watching how a samovar is prepared gave me new insights as to what the purpose of certain parts of the samovar have. Something that I didn't know was that there was a hole from the bottom all the way to the top, since a fire fills this hole to heat up the surrounding water.
Here's the video that I found.
Additionally when modeling the samovar, I wanted to make sure that there are some parts missing, to show that its not as functional from the years of it being used.
Some of the more complicated parts of the model that repeat, I created separately and then placed them with symmetry afterwards.

For the decorative holes in the metal I had a similar approach to the feet, however instead of being added to the model, I wanted it to be subtracted. So I used the objects to boolean the holes.

Here is the final high poly mesh. There are some imperfections on the surface due to the holes affecting the smoothing of the cylindrical face, and this is something that is quite difficult to fix. I decided to leave it as these imperfections will be difficult to notice once the model is textured.

And then here is the low poly version. The parts of the model that are separate from the main mesh are distanced apart to avoid any artifacts when baking. I will say that the model does look like its fairly dense, but this is mainly due to it being cylindrical. Cylindrical objects need more polys so that they don't appear choppy.

With texturing I focused on getting an old brass like metal with lots of dust and imperfections that would be due to age. My main reference for the material was based off of two images which I've shown before.

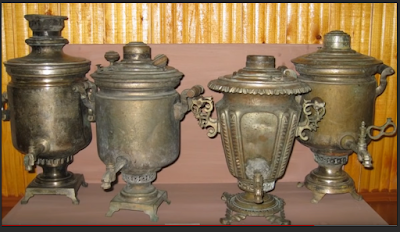
These two images helped with figuring out where dust would collect on the model, whilst also helping creating the colour of the metal.

I built up the material in a few layers. There would be a base colour that coats the whole material. And then there would be a darker colour multiplied on top to give variation, and then another colour that is lighter. This helps give the surface more depth. Then there is wear and tear on the model.
Edges that would have been polished from handling due to them sticking out. There would also be slight scratches that reveal a shinier metal that is just below the top surface.
After the main coating of colour, there would be aging details such as dirt and dust. With some of the dust I would add a slight height to, as dust is a buildup of particles and sits on top of the surface. And adding height slightly replicates that.

Before I mentioned that the highpoly had an issue with surface imperfections due to the holes. I also mentioned that this imperfection will be difficult to see in the final result. And as you can see its barely visible.

Finally I want to show how this asset looks in UE4. The model on the left has lighting baked whilst the other does not. This asset was made in about 3 days, 1 and a half days for high poly, half a day for lowpoly, 1 day for unwrapping and texturing.

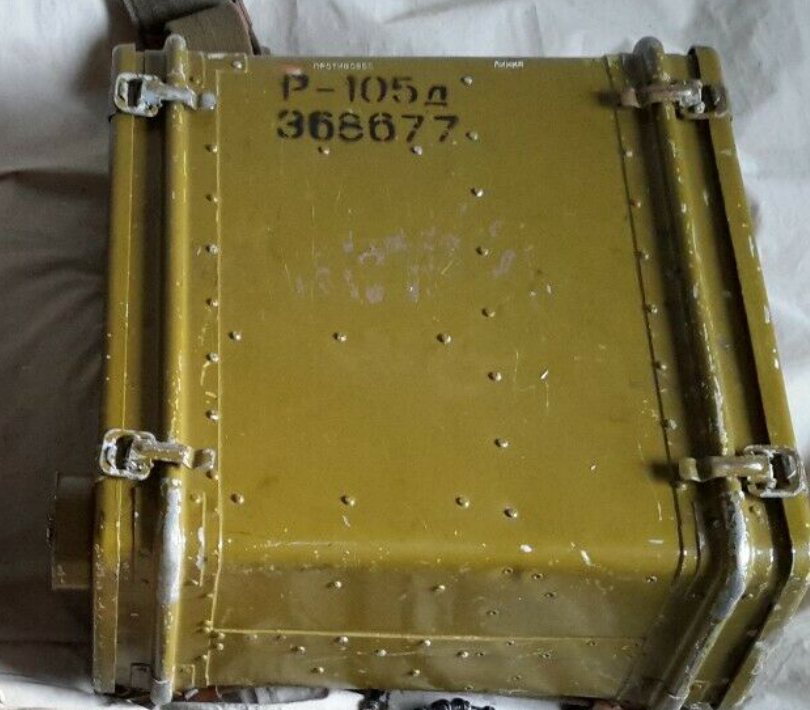
Soviet Radio (P-105/109)

As with all things I first collected reference. Although I will say that I didn't stop collecting references after initially modelling, finding new reference images can help give more insight into parts that might not be clear from other references. There is also a problem of quality with images, some images might not be well lit making details obscure, and others might be low resolution. Finding as many images as possible helps clear those problems.


After completing the main general forms I can then start getting into other smaller parts of the model, such as these clips that lock in the panel that protects the interface of the radio.

A separate piece of equipment that I want to have with the model is a wired phone that connects to the radio. Thinking logically and about the narrative, the player character would be using this radio to listen to things or even talk to people (similar to Metro Exodus). Which is why I've added this phone. I've tried to get it as close as possible to the references I've found and I think I've done a decent job.

The references aren't super clear, but I can somewhat understand the details. I also simplified the model in certain ways to speed up production.


I slowly add more parts to the model bit by bit. The small rivets are all instances, so that If I edit or change them it will be applied to all of them. The majority of the models are simple shapes.

Deciding whats to be baked is somewhat colour coded, if its the same colour then it will be of the same mesh. If its light pink it's also going to be baked down.


For the panel details I re-used the same high poly mesh but inverted it so that I can have both a concave and convex versions. Although the concave version will be mostly covered up with a metal panel that has information on how to set up the radio.


And here's how the bottom looks. Again since this will be an object you can inspect, I have to cover all area's of the object. I can't just delete the bottom to save tri's unfortunately.
One part of the model I want to discuss is the radio antenna, after looking at references I noticed that the antenna is segmented. Instead of having a simple spline, I decided to go the whole mile.

Here is the antenna in question.
My approach to creating this is fairly simple. Create one segment.


Use path deform to get the segmented pieces into position. And its done.

Here is what the low poly looks like. Something to notice is that there are support loops in the low poly that will later be removed, these are in place to bring out a better result in the bake.
Also I want to stress the importance of properly naming models. The reason why a lot of these models have unique names, is so that I can avoid textures bleeding over to one another when baking. Choosing the option to bake with mesh names is a real time saver and comes out with a cleaner bake.

Taking the model into substance painter, I would run into some artifacts here and there. My advice is to fix these issues before fully committing to texturing, as this can be a future set back if left unchecked. Something that helps is painting the model in the 3d view and then locating where that is in the 2d view. Usually you can out why there's a problem by doing this.
Obviously it would be great to avoid all these issues from the beginning, but sometimes there are just small slip ups when managing a complex model. At least these issues can be fixed at this point in the process.


Here is the AO of the bake, I'm proud with how there aren't any problems or issues with the bake. With previous projects I would usually run into problems that couldn't be fixed. But things have worked out decent this time!

Something that I struggled with when texturing, was figuring out the material quality of the case. I know that the physical material the case is made out of is metal. However it has a coating of paint which makes it appear both metallic and not metallic. I thought for a while that I should have it be metallic but I couldn't get the proper colour I wanted no matter how much I tried. Metallic objects appear much darker than their colour suggests because of how the light reacts to it.
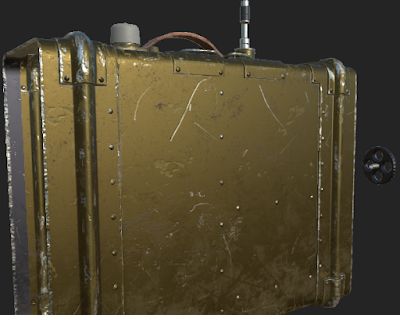

I was also finding a lot of conflicting images, some cases appeared super reflective in the way that its metallic whilst others not. But after finding this image I decided that it wouldn't be metal. I know some artists might go for a grey value for metal when it comes to problems like this, but personally I want to try sticking to the PBR rules/guidelines as closely as I can. Which means that its either black or white.

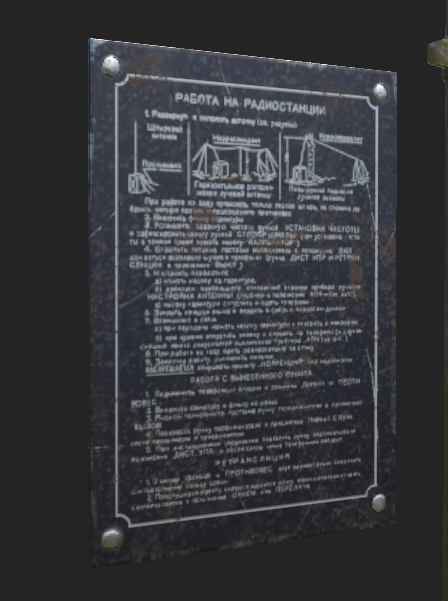
Something that I want to bring attention to is how I created the text on the model. Firstly is the instruction manual on the door. I couldn't find any images of just the illustration and writing. So I took the below image and took it into Photoshop.

I manipulated the image to try and straighten it out. Making it more orthagraphic than perspective. Since there is a light shining on the panel, and there are scratches, unfortunately I'm unable to just value select the writing. So instead I have to manually draw on top of the image.

I tried writing to my best ability, but for a lot of the image the words are blurred and unintelligible. This didn't really matter as most of the large and bold words are easy to read, whilst the others are small and wouldn't be possible to read due to compression on the texture. This took a while to do.

I took the texture I created and imported it into Substance Painter as an alpha, I then used that to basically stamp the details onto the panel. Like I said before, due to the compression most of it will be difficult to read so spelling errors don't matter too much. There's also some dirt to help cover them up too.

For the rest of the text on the interface, I would use a russian keyboard website to manually type out all the writing I saw on the reference, letter by letter. Copy and paste the writing I did into Photoshop, use that as an alpha to then stamp the writing on the model. The reason why I had to do this is because most of the fonts in Painter don't support letters outside of the English alphabet. Additionally I tried translating some of these words, but some seem to be shortened down which makes it difficult figuring out the full word.

For additional story telling, I decided that I would leave a message on the chalkboard. Since the player character is currently sheltering in this decrepit cabin, I thought it would be good to say why this might be happening.
"18:45: рейдеры патрулируют поблизости" means "Raiders patrolling nearby". The player character is listening to the Radio so as to find out the location of nearby Raiders, and if its safe to leave.
"14:02 трансляция остановлена" means "Broadcast stopped working" This could mean a few things, but it mainly points to possibly a public broadcast or some kind of broadcast that is sending out information. And that whatever it was, it has stopped.
With this I want to give a sense that the player character is part of the world and participating, they are listening and taking notes so that they are aware of their surroundings.


Since this Samovar will be an object that can be inspected, it will have a budget of around 10-20k tris.
Ever since my Ubisoft Art Test I've been wanting to do some hard surface high poly modeling, and I wanted to use some of the techniques I learned from that test.


Going into production, I started with creating the high poly. I based the model off of multiple samovar's with different designs. I picked and chose which parts of the designs I wanted to integrate into my model. The main factor for my decisions was time consumption, how long would it take to do a detail and does it add value to the look?

One such decision was having a smooth body instead of an engraved looking one. Firstly there is a lot of difficult as its an angled surface that's also circular. And secondly I want to have some rest space for they eye, as all the other high frequency details will pull the focus.
Since this model is going to be inspected, I have to consider that it will be rotated in different ways. Making it so that I have to have a complete model. Not allowing me to polys that wouldn't necessarily be seen if it was just a static object in the scene.


Something that really helps modeling objects that have a use, is to see how the object is used. It sounds simple, but watching how a samovar is prepared gave me new insights as to what the purpose of certain parts of the samovar have. Something that I didn't know was that there was a hole from the bottom all the way to the top, since a fire fills this hole to heat up the surrounding water.
Here's the video that I found.
Additionally when modeling the samovar, I wanted to make sure that there are some parts missing, to show that its not as functional from the years of it being used.
Some of the more complicated parts of the model that repeat, I created separately and then placed them with symmetry afterwards.

For the decorative holes in the metal I had a similar approach to the feet, however instead of being added to the model, I wanted it to be subtracted. So I used the objects to boolean the holes.

Here is the final high poly mesh. There are some imperfections on the surface due to the holes affecting the smoothing of the cylindrical face, and this is something that is quite difficult to fix. I decided to leave it as these imperfections will be difficult to notice once the model is textured.

And then here is the low poly version. The parts of the model that are separate from the main mesh are distanced apart to avoid any artifacts when baking. I will say that the model does look like its fairly dense, but this is mainly due to it being cylindrical. Cylindrical objects need more polys so that they don't appear choppy.

With texturing I focused on getting an old brass like metal with lots of dust and imperfections that would be due to age. My main reference for the material was based off of two images which I've shown before.

These two images helped with figuring out where dust would collect on the model, whilst also helping creating the colour of the metal.

I built up the material in a few layers. There would be a base colour that coats the whole material. And then there would be a darker colour multiplied on top to give variation, and then another colour that is lighter. This helps give the surface more depth. Then there is wear and tear on the model.
Edges that would have been polished from handling due to them sticking out. There would also be slight scratches that reveal a shinier metal that is just below the top surface.
After the main coating of colour, there would be aging details such as dirt and dust. With some of the dust I would add a slight height to, as dust is a buildup of particles and sits on top of the surface. And adding height slightly replicates that.

Before I mentioned that the highpoly had an issue with surface imperfections due to the holes. I also mentioned that this imperfection will be difficult to see in the final result. And as you can see its barely visible.

Finally I want to show how this asset looks in UE4. The model on the left has lighting baked whilst the other does not. This asset was made in about 3 days, 1 and a half days for high poly, half a day for lowpoly, 1 day for unwrapping and texturing.

Soviet Radio (P-105/109)

As with all things I first collected reference. Although I will say that I didn't stop collecting references after initially modelling, finding new reference images can help give more insight into parts that might not be clear from other references. There is also a problem of quality with images, some images might not be well lit making details obscure, and others might be low resolution. Finding as many images as possible helps clear those problems.

The first of modeling pass I do is mainly to get the correct silhouette and scale. The modelling is fairly simple at this stage as its easier to manipulate and change the model with less detail. I also decide what parts I want to be a physical model in the low poly and what details will be baked down. Most if not all the screws and bolts will be baked down as they add unnecessary geometry to the mesh. Anything that has more depth or is a different material could be a mesh.

Below is what the sides look like, again not too much details as there will be more added in another pass.

After completing the main general forms I can then start getting into other smaller parts of the model, such as these clips that lock in the panel that protects the interface of the radio.

A separate piece of equipment that I want to have with the model is a wired phone that connects to the radio. Thinking logically and about the narrative, the player character would be using this radio to listen to things or even talk to people (similar to Metro Exodus). Which is why I've added this phone. I've tried to get it as close as possible to the references I've found and I think I've done a decent job.

The references aren't super clear, but I can somewhat understand the details. I also simplified the model in certain ways to speed up production.


I slowly add more parts to the model bit by bit. The small rivets are all instances, so that If I edit or change them it will be applied to all of them. The majority of the models are simple shapes.

Deciding whats to be baked is somewhat colour coded, if its the same colour then it will be of the same mesh. If its light pink it's also going to be baked down.


Separated from the main body area the switches and dials, I have them floating away from the main body so as to avoid artifacts when baking. I also made one of the dials have a removable feature, so that I can re-use the same model & texture.


For the panel details I re-used the same high poly mesh but inverted it so that I can have both a concave and convex versions. Although the concave version will be mostly covered up with a metal panel that has information on how to set up the radio.

And here's how the bottom looks. Again since this will be an object you can inspect, I have to cover all area's of the object. I can't just delete the bottom to save tri's unfortunately.
One part of the model I want to discuss is the radio antenna, after looking at references I noticed that the antenna is segmented. Instead of having a simple spline, I decided to go the whole mile.

Here is the antenna in question.
My approach to creating this is fairly simple. Create one segment.
Duplicate that segment. And create a spline for the path.


Here is what the low poly looks like. Something to notice is that there are support loops in the low poly that will later be removed, these are in place to bring out a better result in the bake.
Also I want to stress the importance of properly naming models. The reason why a lot of these models have unique names, is so that I can avoid textures bleeding over to one another when baking. Choosing the option to bake with mesh names is a real time saver and comes out with a cleaner bake.

Taking the model into substance painter, I would run into some artifacts here and there. My advice is to fix these issues before fully committing to texturing, as this can be a future set back if left unchecked. Something that helps is painting the model in the 3d view and then locating where that is in the 2d view. Usually you can out why there's a problem by doing this.
Obviously it would be great to avoid all these issues from the beginning, but sometimes there are just small slip ups when managing a complex model. At least these issues can be fixed at this point in the process.


Here is the AO of the bake, I'm proud with how there aren't any problems or issues with the bake. With previous projects I would usually run into problems that couldn't be fixed. But things have worked out decent this time!

Something that I struggled with when texturing, was figuring out the material quality of the case. I know that the physical material the case is made out of is metal. However it has a coating of paint which makes it appear both metallic and not metallic. I thought for a while that I should have it be metallic but I couldn't get the proper colour I wanted no matter how much I tried. Metallic objects appear much darker than their colour suggests because of how the light reacts to it.


I was also finding a lot of conflicting images, some cases appeared super reflective in the way that its metallic whilst others not. But after finding this image I decided that it wouldn't be metal. I know some artists might go for a grey value for metal when it comes to problems like this, but personally I want to try sticking to the PBR rules/guidelines as closely as I can. Which means that its either black or white.
Something that I want to bring attention to is how I created the text on the model. Firstly is the instruction manual on the door. I couldn't find any images of just the illustration and writing. So I took the below image and took it into Photoshop.

I manipulated the image to try and straighten it out. Making it more orthagraphic than perspective. Since there is a light shining on the panel, and there are scratches, unfortunately I'm unable to just value select the writing. So instead I have to manually draw on top of the image.

I tried writing to my best ability, but for a lot of the image the words are blurred and unintelligible. This didn't really matter as most of the large and bold words are easy to read, whilst the others are small and wouldn't be possible to read due to compression on the texture. This took a while to do.

I took the texture I created and imported it into Substance Painter as an alpha, I then used that to basically stamp the details onto the panel. Like I said before, due to the compression most of it will be difficult to read so spelling errors don't matter too much. There's also some dirt to help cover them up too.
For the rest of the text on the interface, I would use a russian keyboard website to manually type out all the writing I saw on the reference, letter by letter. Copy and paste the writing I did into Photoshop, use that as an alpha to then stamp the writing on the model. The reason why I had to do this is because most of the fonts in Painter don't support letters outside of the English alphabet. Additionally I tried translating some of these words, but some seem to be shortened down which makes it difficult figuring out the full word.

For additional story telling, I decided that I would leave a message on the chalkboard. Since the player character is currently sheltering in this decrepit cabin, I thought it would be good to say why this might be happening.
"18:45: рейдеры патрулируют поблизости" means "Raiders patrolling nearby". The player character is listening to the Radio so as to find out the location of nearby Raiders, and if its safe to leave.
"14:02 трансляция остановлена" means "Broadcast stopped working" This could mean a few things, but it mainly points to possibly a public broadcast or some kind of broadcast that is sending out information. And that whatever it was, it has stopped.
With this I want to give a sense that the player character is part of the world and participating, they are listening and taking notes so that they are aware of their surroundings.


For the final part of this blog post I will show what the model looks like in painter. This model took about a week to make. The high poly took the majority of the time, and the fonts/illustrations took up a decent amount of time as well.


No comments:
Post a Comment