Saturday 23 November 2019

Behind The Door- Week 4


Week 4 - Formative Hand-in Week


Some of the most important parts of this project is the snow. Like I've mentioned previously, if the snow doesn't look great then the whole scene doesn't look believable. A way to make something realistic is by showing evidence of history or marks that people would have made. What is one mark left behind on snow? Footprints. Footprints in snow tells you a lot of information, depending on the amount it can tell you if there is a small amount of people or a large number that was in the same location recently. The colour of the snow is another tell tale sign, if there is repeated back and forth which doesn't allow the snow to settle, then it turns into a slush of snow turned into patches of water and ice.


It should be noted that the brown snow is due to both mud/soil from the ground underneath the snow, and also dust or pollutants. I need to consider the location of the base to determine what extra things can affect the snow.


This material is made up of the snow material that I created previously with a new footprint shape I created and stamped in.

Since this metal grid texture is also a flat surface, I wanted to show footprints on certain areas that would have a buildup of snow. Obviously if I covered the whole metal floor with a layer of snow, then you wouldn't be able to tell that its metal. 


This is a gif that I made on creating the footprint texture. As you can see it is just built up from small shapes that have parts subtracted or warped, to then create the whole footprint. The pattern of the tread is based on a boot that I found on google images. Also a few things I want to note, I made it so that there is only one type of footprint. This is because I wanted to give the sense of a military base and soldiers would most likely have the same uniform and that makes their footprints fairly similar. 

Another small detail I want to point out is the snow that outlines the footprint. Whenever you walk and make a foot print on something like snow it will never be a straight concave shape. To make space for the foot to step down some of the snow surrounding the foot would be dislodged and pushed away making a sort of ridge around the footstep. One thing that I could do to make this much more believable would be to have some random bits of snow clumps/particles near the footsteps. Since the motion of walking would kick up some snow clumps as well. 
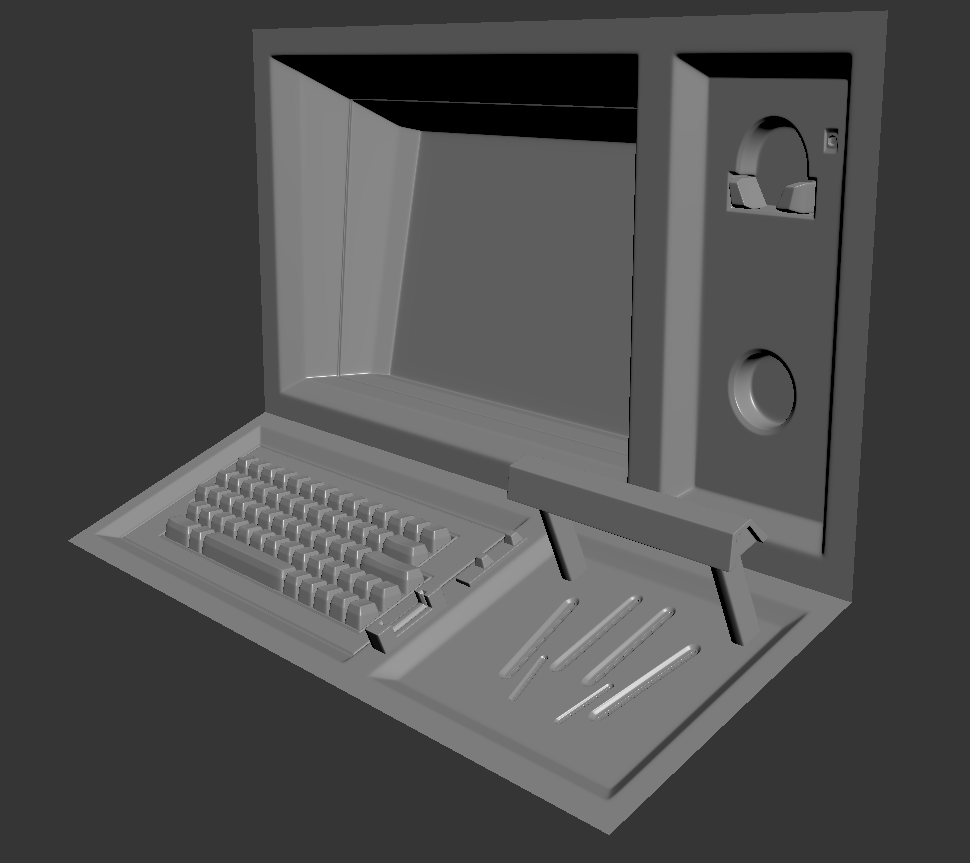
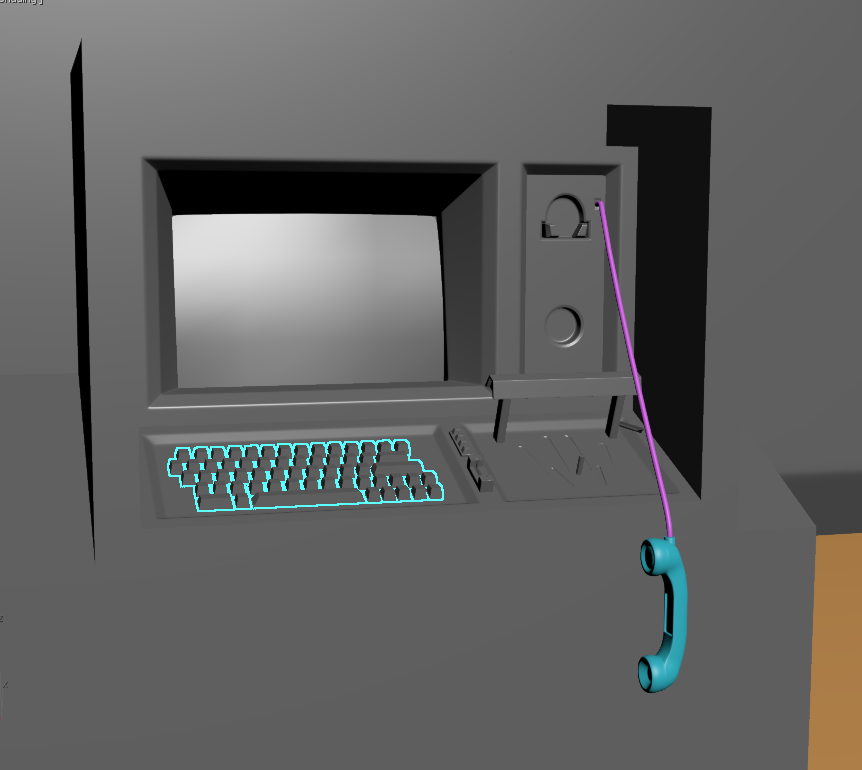
This is a small texture created for the computer screen. I wanted to make it seem as if its older technology to fit in with the whole military feel. I added horizontal lines to give that old computer look. I wanted the screen to be a blaring red screen to give a sense of danger.  Something that could improve this screen would be a screen tear/jitter affect, or even having it animated. Possibly interacting with the computer would play an animation sequence on the screen.


The above image is my master material that I created for this project. So far the components of this is: 

1- A standard material which uses one set of textures for the base colour, normals, rgba combined. 

2- Tiling and offset parameters which allow tweaking of scale position of the textures.

3- Vertex Blending, to be able to paint between two materials instead of having a single standard material.

I know that my master material is pretty bare bones at the moment, but I will slowly add to this when I figure out more of my pipeline for assets, and how I should even create my textures for the most efficient use in UE4. I know that I will most likely add extra parts such as rotation and world alignment. 


Here is the landscape material I have attempted to create. I followed a tutorial to the letter in creating this, however it seems to not work at all. The different materials should be using a heightblend to switch between layer but it doesn't seem to work. For some strange reason there isn't any world displacement (changes in height), the whole landscape texture is flat, and changing the values for the displacement pushes the whole landscape equally. 

This is genuinely a really strange problem because I have asked for help from a multitude of different people, and each person doesn't seem to know why it doesn't work. I also opened the UE4 demo level that was provided with the tutorial to showcase the landscape material, and in there it is also dysfunctional. My only idea of why this is happening is that Epic have changed/updated how landscapes are fundamentally made, making older tutorials obsolete (which has happened with other elements of UE4, eg the light units being updated). 


Here is a close up of both the snow and the metal floor. Something to point out is that there is a nice transition between the thick snow and metal ramp. This transition is helped with the use of a TemporalDitherAA being plugged into the pixel depth offset of the snow material. The only problem with this and anything that looks fancy is that it can be quite taxing on the engine. However since I am focusing on a portfolio piece, this is completely fine.


Lastly one thing I want to mention is the lighting errors on my landscape. For some strange reason the light maps of the landscape aren't blending nicely between each grid, leading to this harsh edge showing the each grids perimeter. I'm not exactly sure as to why this is happening or how to fix this, but I'm sure with more time I would be able to find some sort of fix.

Beauty Shots of the environment

As what is required of us for formative hand-in, I had to take "beauty shots" of my scene. This is basically just pictures of any points of interesting area's and presented in a decent composition. 


In summary of this project

My original goals for the project was a good composition, some technical art and a clear narrative. So far I feel like I have completed the composition, however my narrative is not there yet. There are many elements missing from the scene that are needed to tell the story. I think I may have overestimated what I could do in this project. I spent the whole of week 1 learning and creating the snow and fog in the scene.  To create the fog, I had to first learn Houdini, and then create a smoke texture, and finally apply it to a particle system in Unreal. Although it frustrates me that I spent so long on this part of production, I feel like it was necessary as it allowed me to learn much more about materials and particles in UE4 and was a good introduction to Houdini.

The second week was spent modeling the scene and creating the snow texture. I had a rough block-out in the first week, but by the end of the second week I had almost game ready models minus the collision. I also created the high and low poly versions of the entrance terminal and prepped them for texturing.

The third week was spent creating materials for the whole of the environment, and I created a master material that can be changed easily on the fly within an instance. I also made it so that I could vertex blend between 2 different materials using the red channel. If I had more time I would have added another vertex blend in the blue channel so that I could paint a layer of frost onto the materials as well.

I feel happy that I have learned a lot from this project. But I feel as though there is so much more that I need and want to do. Somethings I would do differently if I could do this project again from the start, would be creating a master material in the beginning. I didn’t do this because I didn’t necessarily know what I needed at the start. But since I now know what I need, it would make it so much easier for myself by setting this up in the beginning. I also learned that I need to be much more thorough with my planning in the beginning. I tried a different method using Trello, but that didn’t really help me that much, what I think works is just a simple excel sheet that shows what’s not done. This would be more useful as it would give a better direction whenever I feel like not knowing what to do. I think also having clear deadlines for each part of the process would give me more motivation

Sunday 17 November 2019

Behind The Door- Week 3


Week 3 - Textures & Unwrapping


Last week I prepped the Entrance Terminal for baking and texturing. This week I finally get to texture the terminal. At this moment I found out that I was missing some details that I didn't model in my high poly, but their's no reason to worry since I can create what I need in Substance Painter. Also something I kept in mind was the fact that the texture size is a 1024, which doesn't allow for fine details, but also smooths out any blemishes.

The buttons of the phones keypad was something I forgot to make in the high-poly. If I had a higher resolution texture sheet I would have gone back and created the buttons in the high-poly, this way I would get a clean and controlled result. I find that creating buttons in substance has too soft of an edge/bevel, although using a levels on the black mask could allow for more control on the bevel.


The frost that I created is made up of two different layers. The first uses is a more unique painting of general frost, I used a fill onto the black mask, using the ambient occlusion to spread a light colour into the crevices of the terminal. Then I used two different grunge maps to remove and add variation to the ambient occlusion. I would then use paint layers on top to add a more unique touch to the texture. 

The second is for large frost/snowflakes. It's created from a folder with two fill layers inside that have large shapes. Using a black mask on the folder allows me to control the placement and opacity of the snowflakes.    


Below is a resistor that is part of the electrics in the terminal. As an added detail, I wanted to have some wires forcefully pulled out of place to show desperation. I only wanted to texture this small model since it has generic features and would be duplicated a few times. 

I worked on the keys in the keyboard in a separate substance file my reasoning is that the keys would be floating and obscuring parts of the Terminal, it would also be easier navigating the scene if the keys are separate. 

My environment is mostly comprised of concrete and metal and snow. Since the concrete material will be applied to large structures and the texel density is 1024 per square meter, this concrete will tile a lot. So my goal was to create a texture that is read as concrete, but not too noisy that its noticeably tiling. Since I could add any grime or wear with decals. 
The next material i created was rust. Although looking back, this material is fairly unnecessary as I mostly blended between a clean metal and the metal with some of the rust being revealed, which is below this picture. 
This is a rusty metal, later on I toned down the noise of both the albedo and roughness in the metal. I also removed the height information of the flaking around the rust, since that would only appear on painted metal and this is not a painted metal.

Something that I experimented with was creating deformation on the door. I wasn't exactly sure as how I should approach this, so I did this early on in the week to get a proof of concept. 

What I wasn't sure about was whether to do a high to low bake, or a POM Decal. With the high to low, I could section off one area of the model with a second UV channel to be baked and textured. The only problem with that is making sure that the unique and tiling textures line up and also having a consistent texel density, I'm also not sure if this would work either. 

The other method that I'm more confident with is the POM decal. I've used this in the previous project, and it should work. The only downside to this is that if I want to deform the shape of the door, I would have to manually do this to the low poly. This is also a fairly efficient workflow, as it doesn't require a second UV channel.


Before I spend a long time sculpting a masterpiece, I wanted to see if my theory would be correct first. So I created a quick texture in substance designer and used that as a sort of place holder.


Looking at the result of this I can definitely say that this should be how I should approach creating the deformation on the door. Although it is slighty more engine expensive due to being a decal and a POM. Its efficient and works.

Saturday 9 November 2019

Behind The Door- Week 2


Week 2 - Composition & Modeling


I feel as though I don't have much to show for this week. Because I haven't necessarily learnt something new or went deeper into UE4. However I have done something and its an important part of the project.

Something that I struggled with in my last project is composition and narrative. My focus was on learning technical aspects that lead to me overlooking the more core principles of an environment: Compostion, Shape Language, and Narrative. 

This time round I wanted to sharpen my skills and prove that I can successfully create an environment with a clear composition and an understandable narrative.

Following on from the draw overs I made last week I started to model out the entrance of this bunker. Unfortunately I made the mistake of not taking a lot of screenshots of the process, but I can break down what I've done.


A lot of the models were quite primitive shapes at first. I got them into UE4 as soon as possible, so that if I keep iterating on the models I could just re-import them and they will stay in the same position. After placing the models into their positions, I worked on adding finer details such creating the relief of the door in the wall. Or creating the hole in the supporting structure to allow a ladder through.


After getting the overall composition down and the models in the scene I started focusing on creating the high poly meshes for my focus areas. 


This is the entrance terminal to the bunker. It's basically a bash of a few ideas together. My thought process for this terminal is that its a high security bunker, so they would most likely have multiple layers of security to get in. 

First you would slot in your ID card. 
Then you would type into the computer. 
And finally you would probably have some sort of scan either fingerprints or retina. 

Additionally if the computer is broke or the door doesn't open, you would need to phone for technical help which is why there is a phone.

So with this frame of thought I found references for each stage.


MDT9100 is a car interface. Very retro with large keys.


This is interestingly called a Indentimat, from information I could find online its supposed to be a hand geometry scanner for the infamous F-117 Nighthawk stealth attack program. Although people now link it to the Area 51 conspiracy, that this scanner is used to get into top secret locations in Area 51. I don't really care about this scanners purpose or history, I just really like the shape language.

Along with these references, I also looked at the Nostromo in Alien. 


The ID card slot. And some flashing buttons.


Closeup of the phone.
  

Some of the narrative I wanted to tell is that this person who was killed, desperately tried to get into the bunker. To convey this I had the phone hang down off the line. 

Since this entrance terminal is practically the only object with unique textures, I thought it would be important to get this prepped for baking and texturing as soon as possible, as I can find making unique textures takes longer than making tile-able textures. This is because of getting a good bake result. With the Unwrap I tried to be as efficient as possible, having all the keys in the keyboard to be aligned on the V axis, to make it easier to texture later.


After unwrapping I prepared my model for baking by using a technique called explosion bake, this requires the geometry of the model to be separated by a large distance, this gives space between the cages of the mesh so that there isn't any artifacts caused by overlapping cages.

The other method is to bake by mesh name, which requires you to detach every single mesh and give it a unique name, and give the high poly the same name.  

There are tools that can explode the mesh for you, however I did this manually since this was the first time I've ever tried explosion baking.  


Here's everything together below.


Something to notice as well is that the Screen is not present. The reason for this is because I have separated the screen entirely so that I can do some animated textures and some other cool stuff with it.

The last thing I did this week was finalize the concept of the environment. There were small details that I wanted to have which would make the environment that much more believable, such as the icicles on overhanging surfaces, or the emergency red lights.

The major goal I wanted to figure out was the colour scheme. Some critique I was given was that my scene was quite boring since there was just concrete and metal, which are both quite dull colours. And that I should add a splice of colour. I was looking at Doom 2016, and I noticed that there was a splash of colour that was used to direct the player, and to break up the monotony of the metal and plastic.  


And here is the rough colour concept.


I think a piece of advice that I need to remember for future projects is to go off of other peoples concepts, because I spent a lot of time figuring out everything about this scene, when all of that could be spent on production. And although its great that I can create something original, realistically I won't be able to do this when I am working for a studio.